iOS, Do Not Disturb

Use Do Not Disturb on your iPhone, iPad, and iPod touch

With Do Not Disturb, you can silence calls, alerts, and notifications that you get while your device is locked. You can also schedule Do Not Disturb and allow calls from certain people.

Turn Do Not Disturb on or off

When Do Not Disturb is on, there's a crescent moon  in the status bar. There are two ways to turn Do Not Disturb on or off:


Go to Settings > Do Not Disturb to turn on Do Not Disturb manually or set a schedule.

ios13-iphone-xs-settings-do-not-disturb-on.jpg


Open Control Center, touch and hold  to quickly adjust your Do Not Disturb settings or tap  to turn it on or off.


If you set an alarm in the Clock app, the alarm goes off even when Do Not Disturb is on. Learn how to set and manage your alarms.


Change your settings

If you don't want to be disturbed at a certain time, you can set a schedule. Tap Settings > Do Not Disturb and turn on Scheduled. Then set a time.

ios13-iphone-xs-settings-do-not-disturb-scheduled.jpg

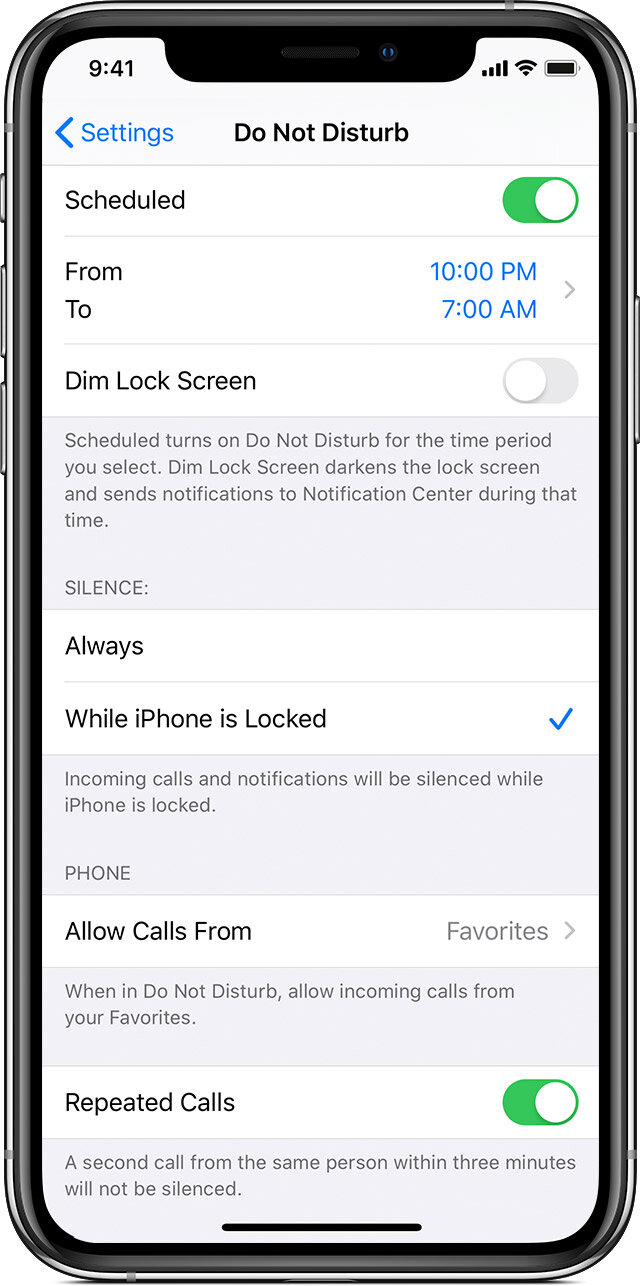
You can also choose when you want to receive alerts, calls, and notifications:

  • Bedtime: When Bedtime is enabled, the Lock screen will dim, calls will be silenced, and notifications will appear under During Bedtime in the Notification Center until your scheduled Do Not Disturb ends.

  • Silence: Choose to silence calls and notifications always or only when the device is locked.

  • Allow Calls From: Allow calls from everyone, no one, your favorites, or specific contact groups stored on your device or iCloud.

  • Repeated Calls: If someone calls you twice within three minutes, the second call isn't silenced.


Learn more

Time Machine

Back up your Mac with Time Machine

Learn how to create a backup of the files on your Mac.

You can use Time Machine, the built-in backup feature of your Mac, to automatically back up all of your files, including apps, music, photos, email, documents, and system files. When you have a backup, you can restore files from your backup if the original files are ever deleted from your Mac, or the hard disk (or SSD) in your Mac is erased or replaced.

Create a Time Machine backup

To create backups with Time Machine, all you need is an external storage device. After you connect the device and select it as your backup disk, Time Machine automatically makes hourly backups for the past 24 hours, daily backups for the past month, and weekly backups for all previous months. The oldest backups are deleted when your backup disk is full.

Connect an external storage device

Connect one of the following external storage devices, sold separately. Learn more about backup disks that you can use with Time Machine.

  • External drive connected to your Mac, such as a USB, Thunderbolt, or FireWire drive

  • External drive connected to an AirPort Extreme Base Station (802.11ac model) or AirPort Time Capsule

  • AirPort Time Capsule

  • Mac shared as a Time Machine backup destination

  • Network-attached storage (NAS) device that supports Time Machine over SMB

Select your storage device as the backup disk

tm_new_drive.png

When you connect an external drive directly to your Mac, you might be asked if you want to use the drive to back up with Time Machine. Select Encrypt Backup Disk (recommended), then click Use as Backup Disk.

An encrypted backup is accessible only to users with the password. Learn more about keeping your backup disk secure.


If Time Machine doesn't ask to use your drive, follow these steps to add it manually:

macos-high-sierra-system-preferences-time-machine.jpg
macos-high-sierra-system-preferences-time-machine-select-backup-disk.jpg
  1. Open Time Machine preferences from the Time Machine  menu in the menu bar. Or choose Apple () menu > System Preferences, then click Time Machine.

  2. Click Select Backup Disk (or Select Disk, or Add or Remove Backup Disk):

  3. Select your external drive from the list of available disks. Then select ”Encrypt backups” (recommended) and click Use Disk:


If the disk you selected isn't formatted as required by Time Machine, you're prompted to erase the disk first. Click Erase to proceed. This erases all information on the backup disk. 

Enjoy the convenience of automatic backups

After you select a backup disk, Time Machine immediately begins making periodic backups—automatically and without further action by you. The first backup may take a long time, depending on how many files you have, but you can continue using your Mac while a backup is underway. Time Machine backs up only the files that changed since the previous backup, so future backups will be faster.


To start a backup manually, choose Back Up Now from the Time Machine  menu in the menu bar. Use the same menu to check the status of a backup or skip a backup in progress.

backup_complete_notification.png

Learn more

  • Restore your Mac from a backup

  • Other ways to back up and restore files

  • If you back up to multiple disks, you can switch disks before entering Time Machine. Press and hold the Option key, then choose Browse Other Backup Disks from the Time Machine menu.

  • To exclude items from your backup, open Time Machine preferences, click Options, then click the Add (+) button to add an item to be excluded. To stop excluding an item, such as an external hard drive, select the item and click the Remove (–) button.

  • If using Time Machine to back up to a network disk, you can verify those backups to make sure they're in good condition. Press and hold Option, then choose Verify Backups from the Time Machine menu. 

  • In OS X Lion v10.7.3 or later, you can start up from your Time Machine disk, if necessary. Press and hold Option as your Mac starts up. When you see the Startup Manager screen, choose “EFI Boot” as the startup disk.

Identify Chromebook network information

sample-chromebook-macaddress.png

Find your MAC address or IP address

Some administrators restrict network access to prevent outsiders from seeing private information on the network. To use the network, you might need to give your Chromebook's MAC or IP address to your administrator. To find the MAC or IP address:

symbold-WiFi-chromebook.png
  1. If you haven't yet, sign in to your Chromebook.

  2. At the bottom right, select the time.

  3. Select the Wi-Fi network.

  4. At the top of the box, select Information .

  5. You'll see your Chromebook's IP address and IPv6 address. Your MAC address is labeled "Wi-Fi."

symbol-information-chromebook.png