
| Version | Supported Mac OS 10.## | Supported Windows |
|---|---|---|
| v15 | macOS 10.13, 10.14, 10.15, 11.1 | Windows 7,8,10 |
| v14 | Mac OS X 10.11, macOS 10.12, 10.13, 10.14, 10.15 | Windows 7,8,10 |
| v13 | Mac OS X 10.10, 10.11, macOS 10.12, 10.13 | Windows Vista,XP,7,8,10 |
| v12 | Mac OS X 10.8, 10.9, 10.10, 10.11, macOS 10.12, 10.13 | Windows Vista,XP,7,8,10 |
| v11 | Mac OS X 10.7, 10.8, 10.9, 10.10, 10.11, macOS 10.12 | Windows Vista,XP,7,8,10 |
| v9 | Mac OS X 10.6, 10.7, 10.8, 10.9 | Windows Vista,XP,7,8 |
Markup, iOS Photos
more
sketch
(plus) add
Photos
Go to Photos and select the photo you want.
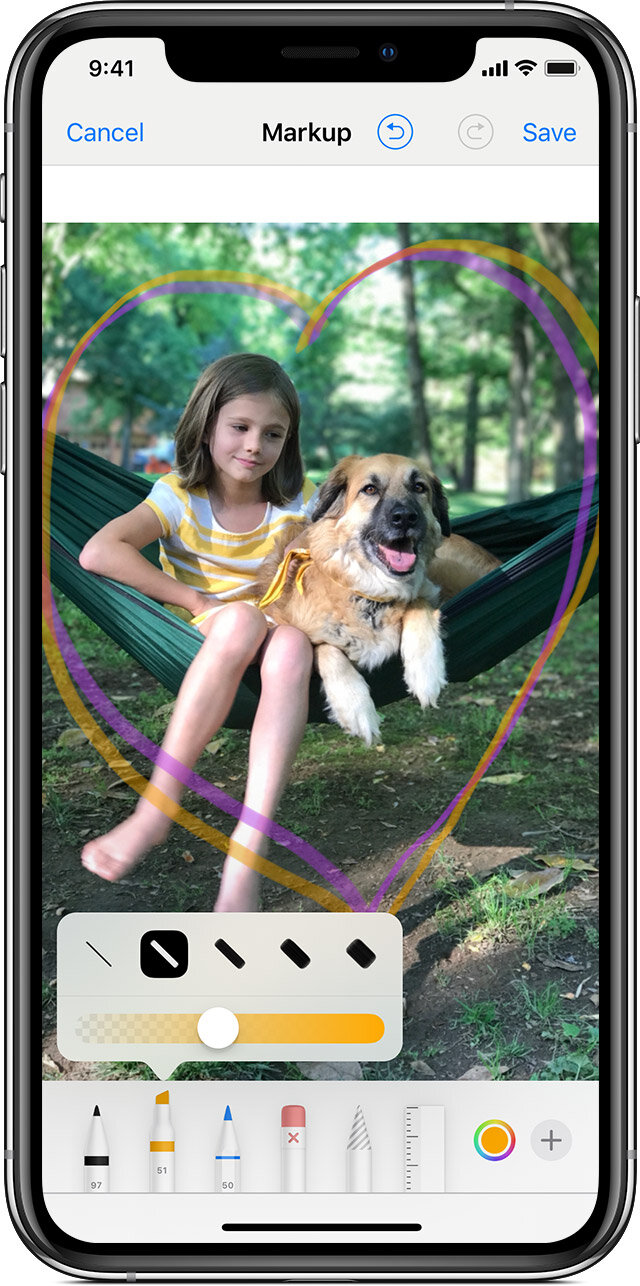
Tap Edit, tap more, then tap Markup . Tap the plus button to add text, shapes, and more.
Tap Done, then tap Done again.
Draw with Markup
After you choose a Markup tool, like the pen , highlighter , or pencil , select a color and start drawing. Tap the same tool again to change the color opacity, or tap another tool to change the thickness. You can also tap the color button to change color shades.
Move a drawing
After you draw something, you can move it around. Tap the Lasso tool, trace a circle around the drawing that you want to move, then drag it where you want it.
Erase or undo a drawing
To redo a drawing, tap the eraser button and rub your finger across the area you want to erase. You can also undo any markup action by using the undo button . If you accidentally undo a markup, you can shake your device and tap Redo.
Add text, a signature, magnifier, and shapes
Tap the plus button to choose from other Markup tools:
Tap the circle to choose a different text color, then tap to adjust the font, size, and alignment.
Quickly add or create a signature for a document.
Drag the loupe around, use the blue dot to adjust the size, and the green dot to increase or decrease the magnification level.
Tap a shape to add it to your screenshot, photo, or PDF. Drag the shape to where you want it and use the blue dots to adjust the size and shape. Use the green dots to adjust the arrow's curve and the speech bubble's appearance.
WiFi Calling, Verizon

https://www.verizonwireless.com/support/wifi-calling-faqs/
How do I enable Wi-Fi Calling on my iPhone®?
To activate Wi-Fi Calling, you must be connected to the Verizon Wireless data network to turn on Wi-Fi calling.
To enable Wi-Fi Calling on your iPhone:
First, verify that you meet all of the eligibility requirements.
Turn on Wi-Fi Calling:
Go to the Home Screen.
Tap Settings.
Tap Phone.
Tap Wi-Fi Calling.
Tap or slide Wi-Fi Calling On This iPhone. (slider will be green)
Tap Enable
Follow the onscreen instructions to enter a US address for use in the event of an emergency call (911).
Once your address is saved, the Wi-Fi Calling setting will be turned on. You are now able to take and make Wi-Fi calls on your iPhone.
Who is eligible for Wi-Fi Calling?
To be eligible for Wi-Fi Calling, you need to:Have a phone that's HD Voice-enabled and Wi-Fi Calling-capable.
All currently available smartphones are HD-voice-capable.Have the HD Voice feature on your account and activatedNote: If you have any features that are incompatible with HD Voice, you'll need to remove them before you add the HD Voice feature to your account. Find out about which features aren't compatible with HD Voice, or learn more about HD Voice and how to activate it.
My phone number is on a business account. Can I use Wi-Fi Calling?
Yes. As long as your line already has HD Voice and doesn't have the "Block Wi-Fi Calling" or the "Voice Block" features on the account.
iOS, Do Not Disturb
Use Do Not Disturb on your iPhone, iPad, and iPod touch
With Do Not Disturb, you can silence calls, alerts, and notifications that you get while your device is locked. You can also schedule Do Not Disturb and allow calls from certain people.
Turn Do Not Disturb on or off
When Do Not Disturb is on, there's a crescent moon in the status bar. There are two ways to turn Do Not Disturb on or off:
Go to Settings > Do Not Disturb to turn on Do Not Disturb manually or set a schedule.

Open Control Center, touch and hold to quickly adjust your Do Not Disturb settings or tap to turn it on or off.

If you set an alarm in the Clock app, the alarm goes off even when Do Not Disturb is on. Learn how to set and manage your alarms.
Change your settings
If you don't want to be disturbed at a certain time, you can set a schedule. Tap Settings > Do Not Disturb and turn on Scheduled. Then set a time.
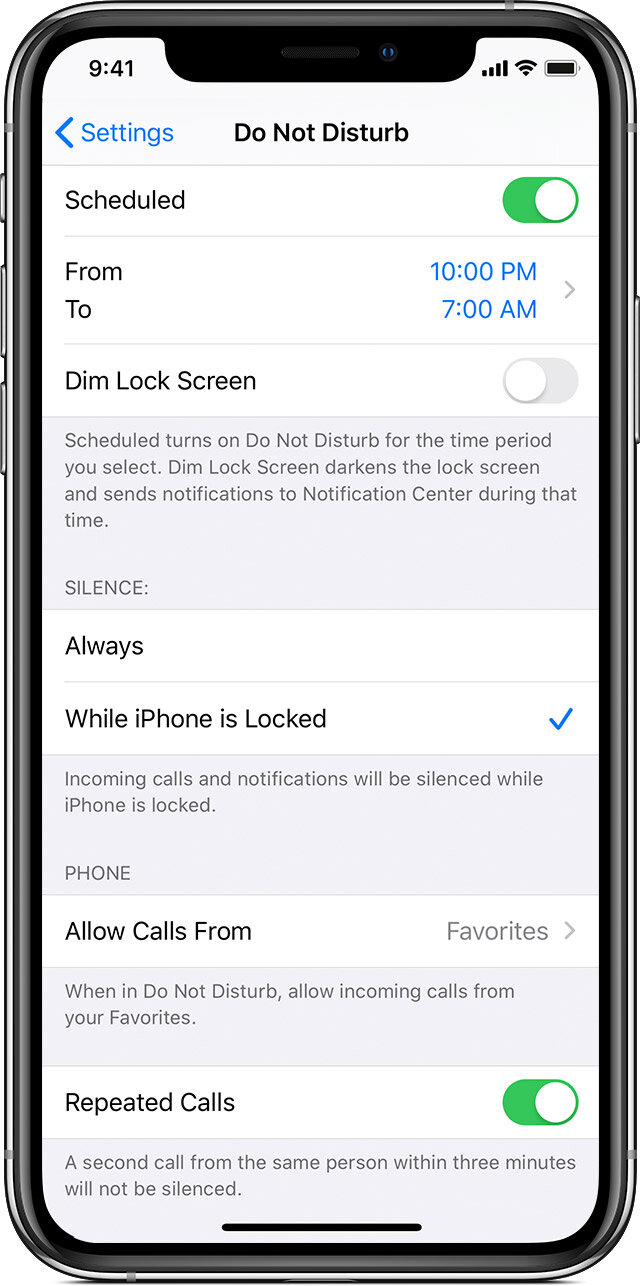
You can also choose when you want to receive alerts, calls, and notifications:
Bedtime: When Bedtime is enabled, the Lock screen will dim, calls will be silenced, and notifications will appear under During Bedtime in the Notification Center until your scheduled Do Not Disturb ends.
Silence: Choose to silence calls and notifications always or only when the device is locked.
Allow Calls From: Allow calls from everyone, no one, your favorites, or specific contact groups stored on your device or iCloud.
Repeated Calls: If someone calls you twice within three minutes, the second call isn't silenced.
Learn more
Use Do Not Disturb While Driving to silence notifications automatically when you're in your car.
View and manage your notifications and reduce interruptions throughout the day.